Wednesday, March 31, 2010

Branch: The Story

While busily working on party fare, one sister turns to the other and says, "We need to create height on the candy shoppe table. I think I need a tree branch, an old dead, dried one. Do you happen know where we could get our hands on one?"

"What??? What are you going to do with that?" Older sister excitedly explains her plans to middle sister. With a bewildered and hesitant look on her face, middle sister agrees to send her son on a little hiking trip to the mountains in search of the perfect branch.

Several similar conversations later and still, no branch.

While sitting in her car at a stop light on a busy highway, middle sister gazes outside to find what looks like part of a branch sticking unobtrusively from the hedges alongside the road. She quickly finds a parking spot and runs to the location.

In a very busy intersection with many curious onlookers, the good middle sister removes the branch that is wedged into the bushes. Embarrassed and bleeding after being poked by it's many thorns, middle sister quickly telephones her older sister with the good news. "I found a branch! I found a branch! I think this is exactly what you are looking for. It's dead and dried and it leans to one side just like you described. I think it's just perfect!"


And it was.


Tiny clusters of red paper flowers...


with faceted beaded centers.


Chartreuse green leaves on delicate branches...


surrounded by sweet ladybugs.


It turned out exactly the way I had envisioned it would.

Aloha!

Monday, March 29, 2010

Congratulations, Grandma Chicken!

Many thanks to all that have taken the time to drop by and enter the Good Eggs Giveaway. Your comments were heartwarming and delightful.

I am happy to report that a winner has been chosen by random number generator. Without further ado, the winner is entry number 9, imagrandma2five, a.k.a., Grandma Chicken of Grandma Chicken's House. Don't you just love her name?

Congratulations!


Have a wonderful day!

Aloha!

Friday, March 26, 2010

Party Prep

My sister and I have been working feverishly over the last several weeks creating ladybug themed items for her granddaughter's first birthday party.


We just finished these sweet rosette napkin rings last night.


We also decorated several bins which will be used to hold packages of candy in the birthday party sweet shoppe.


We have been working like busy little ladybugs trying to get it all done. The party is a mere 8 weeks away and there's still a lot more to do. Can't wait to see how all the components will fit together. Will keep you posted!

Thank you all for entering the giveaway and for posting such wonderful comments. I cannot tell you how many times I laughed out loud at some of them and with others, reflected back to my own childhood.

I appreciate that you take the time to visit me and most of all, thank you for your kindness. You are just too sweet!

Have a wonderful weekend!

Aloha!

Wednesday, March 24, 2010

Good Eggs Giveaway

THE GIVEAWAY IS NOW CLOSED. THANK YOU FOR ENTERING!

I believed in the Easter Bunny for way too many years. Even when I was old enough to reason, I continued to have my doubts about whether he actually existed. I am the eldest of 4 siblings and my parents kept the Easter Bunny legend alive and well for many, long years. Something inside of me said that if I stopped believing, I would end up without an Easter basket on Easter morning. So I continued to sorta-believe for most of my early years. Just in case.

I tried to keep the Easter Bunny legend alive with my son too. It worked when he was really young but when he got old enough to comprehend, he kept pressing me about how the Easter Bunny could possibly get into our house to deliver his basket since we kept all of our doors locked. Only after you have dealt with an overly intelligent, know-it-all, persistent 5 year old, would you come to understand the difficulty of keeping up the ruse.

Okay, so my story was an outright lie. I told him that the Easter Bunny was able to enter our home through our front door by opening the lock with the tips of his ears. I know that it sounds completely insane but that was a line that I had taken from one of his storybooks. If it was in print then he'd believe it, right?

Yes, I'm still asking myself, WHAT WAS I THINKING?? Couldn't I have come up with something better?? I will never forget how he challenged me and said that it was impossible and that I should stop telling stories and that lying was bad. The kid was as smart as a whip and wasn't buying any of it. As the years progressed, I blew the Easter Bunny's cover. I had to. It became increasingly difficult dealing with this issue. The kid had finally worn me down.

A part of me cannot wait to see how he will handle this with his own children. I hope that I am around the conversation just so that I can watch Mr. Smartypants get grilled the way he grilled me.

Yes, even though they were trying times, I still believe that it is a parents right to pass along these childhood legends. If I had to do it all over again, I would. Except for the part about opening the door with the tips of his ears. I'd probably change that to something about the Easter bunny and his magical powers or something. That somehow seems a lot more logical to me now. *Smirk*

A huge thank you goes out to Sandi at A Legacy of Stitches for inviting me to participate in her Good Eggs Giveaway. I expect that you will have loads of fun as there are a good number of participants giving away some really wonderful items. My giveaway is open to everyone. As you hop along the bunny trail, please be sure to read each participants rules as they may differ.

I thought that I'd pass along a small piece of Hawaii through this giveaway. I know that I live in a very special place thanks to generations before me who decided to make their home here in the islands.

This giveaway will include eight, 1/2-yard cuts of 45" dress-weight Hawaiian print fabric.


A box of Maui Caramacs and a box of Chocolate Covered Macadamia Nuts.


A box of Kona Coffee Macadamia Nut Cookies.


A Floor Buddy. I don't know if these are unique to Hawaii or not. They are usually kept in the kitchen on the floor to wipe up small spills. The bottom is lined in an absorbent terry cloth. You slip it onto your foot like you would slippers and use your foot to wipe up the mess. No more bending!


Lastly, a colorful Surf's Up mug for hot or cold beverages.


My giveaway will run from March 24, 2010 through midnight EST on March 28, 2010. A winner will be selected by random number generator on March 29, 2010 and the package will be mailed on March 31, 2010. Please be sure that you leave me a way to contact you should you be the winner.

To enter this giveaway, please comment under this post. Any comment will do but an Easter related comment would be much appreciated. One entry per person please.

Please click HERE to continue hopping down the bunny trail for more fun!

Aloha!

Wednesday, March 17, 2010

Too Many Irons in the Fire

It seems that I have too many projects going on at the same time.

I'm crocheting again. I usually crochet afghans during the winter months when the weather is a bit cooler but it seems that I am a little late this year.


Having fun playing with hexagons and joining them together in a different way this time.


Making hexagon rings. I see so many possibilities with these.


Enjoying the process of piecing half square triangle blocks.


They make such a pretty chevron pattern. One day I will make a quilt from these blocks...when I have the time, which will probably be close to never.


Hopefully there will be some completed projects around here soon because having so many unfinished ones make me a little anxious.

So much to do. So little time. I'm sure that's your story too, huh?

Aloha!

Thursday, March 11, 2010

Rolled Felt Pincushion

**This tutorial is intended for personal use only.**

This is a quick tutorial for a simple pincushion that requires little to no sewing. It is a perfect project for those that work with children in churches, schools or girl scouts. The children can make it for themselves or as gifts. If you volunteer teaching crafting and sewing in a senior's center, making one of these for each participant along with their own pins and needles would be useful in class and will make a wonderful and appreciated keepsake.

For this project, you may use felted wool in place of felt if you'd prefer. I have also chosen to use Fabri-Tac fabric glue although a white tacky glue works just fine.


Cut a 1-inch strip of felt times any length you desire. Obviously, the longer the strip, the larger your pincushion will be. For this project, I used 56-inches which gave me about a 2-inch pincushion.


Start by rolling up one end of the strip, applying even pressure as you roll.


Mark with a pin the length of the felt that will become the outside row.


Sew (or glue) some cute buttons evenly spaced along the strip.


Place glue onto the back of the strip and glue it around the perimeter of the pincushion.


Cut a cardboard circle the size of the pincushion base.


Glue the cardboard circle to the felt.


Trim the felt close to the cardboard.


Place glue onto the cardboard and glue it to the base of the pincushion.


Completed pincushion. Simple, useful, and inexpensive to make.


An alternative: Choose a bottle cap for the base of your pincushion. I prefer to have the felt protrude 1/4-inch above the top of the bottle cap. You will need to measure the height of your bottle cap and add 1/4-inch to the width of your felt strip.

**Note that a large plastic or metal lid (from plastic bowls or wide-mouthed jars) can be used in place of a bottle cap. This would either make a large pincushion or a drink coaster. The benefit of having a drink coaster made in this fashion would be that any condensation left from drinking glasses would not seep through and damage wooden surfaces.**


Roll the felt as indicated above. Add a generous puddle of glue to the inside bottom of the bottle cap and glue the felt roll into place.


To decorate the bottle cap, glue on a strip of felt and top that with some pretty ribbon. If you happen to have a really cool bottle cap, just leave it as is.


I hope that you enjoyed this pincushion tutorial. I have been making these for almost as long as I can remember. It makes a great traveling pincushion because it is small, and if you forget it somewhere, no big deal!

Have a wonderful and creative day!

Aloha!


P.S. I apologize to those of you that have me on reader and caught my earlier post. I begin each of my postings with a series of notes and photographs and then return to refine it when I have the time. I mistakenly pressed the wrong button and posted it in it's raw form. Oopsie!

Thursday, March 4, 2010

Pass the cheese, please!

Your every day Ruby Red variety lunching on a wedge of Swiss.


Premium Yellow with a discriminating taste for Gouda.


There's always a few snobs in the bunch!

Aloha!

Strawberry Mice Pincushion

**This tutorial is intended for personal use only.**

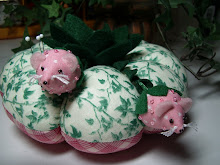
Thank you for your response to my strawberry mice. I was uncertain whether these mice would be of interest simply because they are quite tiny and a bit fiddly to make. This is just a quick little tutorial showing you the basics. If you dislike working in miniature, please feel free to make these larger. They're a fun project either way.

Let me just say that although you can hand stitch the components together (and drive yourself crazy), gluing is so much easier when working with tiny pieces like the ears. I have used a combination of stitching and gluing. My fabric glue of choice is Fabri-Tac.


To create the body of the mice, start with a 4" circle. Cut the circle in half at the center point. Each half will make one mouse.
Fold the half-circle in half, right sides together. Using a 1/4" seam, sew along the straight edge. Turn right side out.


With needle and thread, take a running stitch along the raw edge. Stuff with your favorite pincushion stuffing. If you will be using the mice as needle sharpeners, you may wish to fill them with emery. Gather tightly, knot securely, and clip thread.


To make the ears, start off with a 3/8" square of felt. Round off all 4 corners. Cut the circle in half.


To create the leaves at the base of the strawberry, start with a 1-1/2" circle. Cut 6 slits 1/2" in length evenly spaced around the circle. Trim the tip of each segment to create the pointy edge of a leaf. Make a small hole in the center and feed rattail cord through the hole. Tie a knot on one end of the rattail.


To create the tail leaves, start with a 5/8" square of felt. Round off both bottom corners and cut the other end into a point. You are trying to achieve a tear drop shape.


Glue the hull leaves over the gathered end of the strawberry, making sure to hide the knot in the rattail between the strawberry and the leaves.

Place a thin line of glue along the straight edge of each ear and glue it into place at both sides of the mouse's head.


Place a small amount of fabric glue to the rounded end of the tail leaves and press it into place around the rattail. Continue randomly adding leaves.


With a beading needle and seed beads, add the eyes and a nose. If you wish, add beads to the body for a little bit of mousie bling.


To create the whiskers, thread 6 strands of embroidery floss onto a needle. Tie a knot approximately 1/2" in from the end of the thread. Sew completely through the snout to the opposite side. Secure the whiskers onto the mouse with another knot. Clip thread to approximately 1/2". Trim each side of the whiskers to the desired length. Separate the individual threads to form the whiskers.


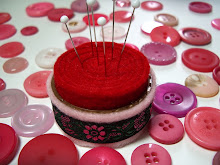
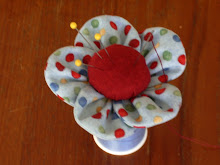
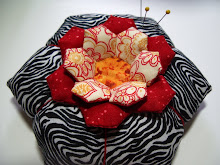
I am sure that most of you already know how to make a round, tufted pincushion. If you do not, I recommend this tutorial to create the body of the pincushion. It is a wonderful tutorial with clear and easy to follow instructions.
I used 8" circles for the body of my pincushion as I prefer a fairly large cushion to accommodate a larger amount of pins.
Follow the tutorial to it's completion, omitting the button on top as this will be covered by the "strawberry bush."


To create the "strawberry bush" that protrudes from the center of the pincushion, cut a 12" x 2" rectangle of green felt. Cut 11 slits, approximately 1" apart, stopping about 3/8" from the bottom edge. Trim the tip of each segment to create the pointy edge of a leaf.


With needle and thread, take a running stitch along the straight edge. Gather and tie a knot to secure.


Roll the straight edge, stitching in place as you go.


To assemble, glue the ends of the tails into the center of the pincushion. Glue the "strawberry bush" on top to hide the mechanics.


Have fun with this tutorial. I hope to see colonies of strawberry mice pop up throughout Blogland.

Have a wonderful and creative day!

Aloha!